10.18.2013

❤ September Haul ❤

September to me is " Back To School " time
As you all know, it might get a bit stressful to adapt to it

So...    What's better than go shopping and get something to cheer up!! ;)


I've bought a lot, I know
But most of them are from the drug store so...
It's not THAT bad is it???


From TopShop, I've got
( Left to Right )
- TopShop Nail Polish in GONE FISHING and LACQUERED
- Velvet Finish Lipstick in INFRARED and BEEHIVE

For nail polish, they are having 2 for about $12.75
I got a mint green for spring/summer 
and a darker red for fall/winter (i know, doesn't look so on camera)


For lipsticks, I've heard a lot raving about them that
They are like a knock-off of the MAC lipsticks so I grab two to test them out
The BEEHIVE is a soft pinky colour that would be a great everyday colour
INFRARED is a bright orange colour and I LOVE ORANGE
so no reason to choose others, right??

I've tried them on and they are sooo smooth and pigmented
SUPER HAPPY about it

I am addicted to LIPSTICKS
You'll see, I MEAN IT ;]


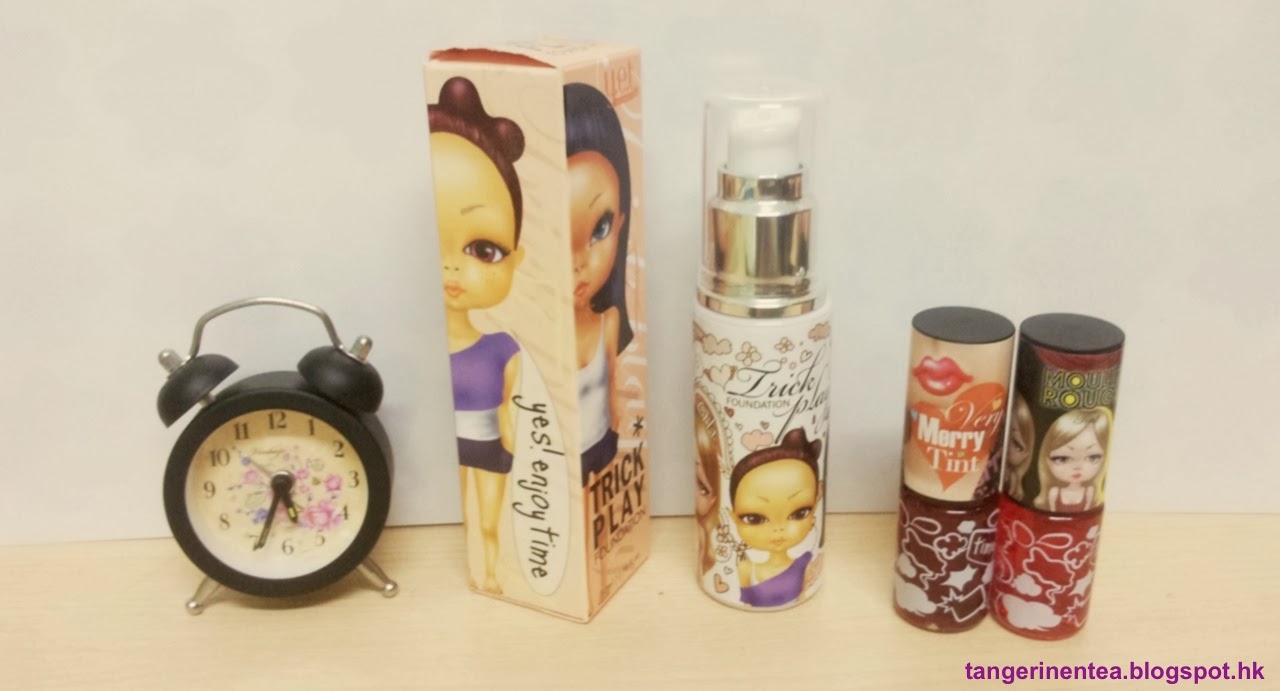
The other day I was shopping with a friend who introduced this Korean Makeup Brand to me
IT's called Y.E.T , short for "Yes! Enjoy Time"
Which I found so funny :D
And I decided to give it a chance

I've got their Sweetly CHEAP goodies include
- Trick Play Foundation in 02 natural beige
- Merry Tint in 02 orange flower
- Moulin Rouge in 02 Red Party
(all 02??!! LOL)


From top to bottom, the swatches are, foundation, orange flower and red party
Barely see the foundation swatch there, matched my skin tone perfectly :)

I was very impressed by the lip tints, they are very pigmented 
so a little goes a LONG way
and they're pretty long-lasting too 


Y.E.T products are with fair qualities and they're amazingly CHEAP
I got all those in a department store for under $22
Can you believe it??

However, their packaging is much less fancy as you may see
it's just plastic and printed paper LOL

And here, I don't know how I group them but...
- Maybelline Define-a-lash Mascara
- Maybelline Baby Lips in Cherry Me
- MAybelline Color Tattoo in Bad to Bronze
- Clinique Chubby Stick in oversized orange

My very dear friend actually gave me all the above from Maybelline
I got the Clinique chubby stick as she recommended it
It doesn't really have the very bright orange color and it hardly shows up with one swatch 
So it's a natural wear and I really need one of those


I am really into Baby Lips as they smells really really good
and they have so many products in the tube :]

On this very day I picked up 2 other Maybelline color tattoos in Too Cool and Pomegranate Punk
Because it's THAT good, and I might got more colors too...
They are so nice for when I am kind of rushing out the door to just splash on my eyelids and GO


Finally, Maybelline Lipsticks!!
(Still left to right)

- Bold Matte in MAT5 and MAT1
- New Vivids in 875 vivid rose and 870 shocking coral

Again, lots of raving about the new vivids line
I know I am super late on this ;(

For the bold mattes, I was window shopping and doing swatches one day in a drug store
I swatch them, blend them a bit on the back of my hand
and I LOVE THEM
swear by it , they are soo good


My favourite is the MAT5 (the top one)
It's a dark red color which with a little bit blending looks sooo gorgeous

I am still trying the others and I'll keep recommending when I find great ones.

Until then, 
BE HAPPY
or if not then smile :) or go shopping or cheer yourself up!!

Have a Happy Day !!

Love you all. ❤


10.12.2013

How To : Turn your Broken WEDGE HEEL into FLATS :)


When your feet suffer from pain and tire brought by those heels and platforms
Don't you just miss a pair of nice laid back flats?

Let's get rid of that stature for once!!

From This............................................................To THIS!!!


I got this idea when this happened :(

So my black and leopard-print wedge heel broke down on me after a shopping spree :(

Well that's LIFE, it gives you LEMONS

So let's grab some tools and make Lemonade!  Umm, I mean FLATS...     from wedge heels

You're gonna need:
1. a trowel / a letter opener / something with a blunt blade
2. Strong contact adhesive glue
3. Mask and gloves as protection (optional)


1. As one of my wedge heel had almost came off all the way,  I peel the top part off with hand and a bit help from the trowel.
2. There you can see the top part is separated from the platform, and the sole of the shoe is coming off as well
3. So I peel the sole of my wedge off with hands. It came right off easily.
4. So my "flat" is now missing a sole.

5. My other wedge heel is completely fine and I need to use the blade of the trowel to help loosen it.
6. Then you want to peel it off with some STRENGTH ;)
7. I then loosen up the sole part of my other wedge too.
8. Peel off the sole part completely to obtain the sole plastic 

9. So here you have the flats,  in vamps and soles 
10. Apply the contact adhesive on both the vamp bottom and sole top, 
to have them stick firmly together, follow the instruction of the contact adhesive you choose. Here I am pressing to hold them together for a while.

You might want to wear protection as I (wish to) do
The contact adhesive I used here is super strong and smells like poison :(


 There you have it, you've successfully turned the BROKEN wedge heel into Flats!!
Of course I won't recommend doing this on an INTACT pair of wedge

BUT ... If you happened to broke a pair of wedge you really like
Or you needed a pair of nice tuned-down black flats (like me)
This is definitely worth the time.
And it's super easy Right? 


I've tested the d.i.y. flats by wearing it to another shopping spree.
And I must say it worked pretty well. So I'm PROUD. =]


Have a MAGICAL day!!


10.02.2013

Easy Chic Nail Art - Time Saving!!


I've recently seen a lot of great nail art designs on sites like Pinterest and Instagram. Some of them are fabulous and absolutely eye-catching. Sadly, most of them will take too much time to do :(

So here I have a tutorial of an eye-catching yet super simple nail design to share with you.
Barely takes any effort or time :)

So here's what you need :)
- base coat
- 2 nail colours of your choice (I recommend using contrasting colours) 
- a pair of scissors (crafty ones are preferred)
- adhesive tape
- top coat

And let's get started!


Start with applying a base coat to protect your natural nails.


Then apply an opaque layer of the first colour of your choice. For me it's my favourite colour ORANGE!! Here I'm using the Marcia shiny nail colour in #17.
Wait for it to dry for about 10-15 minutes.


 Use a pair of scissors to cut out little triangles from the tape to create chevron tape strip.
I'd prefer the crafty scissors with the blade already made chevron like.
Sadly I don't have one of those. If you do  I'm a bit Jelly -_-
The stripes don't have to be chevron, it can always be waves or zic zag if you like.

Stick the chevron-cut side of the tape on your nails. Either half way or 1/3 is fine.
Paint your nails again with the second colour you've chosen.


Wait for it to dry. And you can put it in iced water for it to dry faster.
Once they are COMPLETELY DRIED, peel off the plastic tape.

Add a layer of top coat to seal in your design and make it more lasting and SHINY :)
With the little chevron chic detail. Your nails are now looking noticeable, stunning and yet simple.


Most importantly we did it all by ourselves. Yay!!
Easy, fun and simple nail arts are great pass time. They also saves some money.

Glam up your day with easy chic DIY nail art.
Love you all and Have a fabulous day.